DTF transfers have reshaped how creators, small businesses, and hobbyists bring custom designs to life. Short for Direct-to-Film transfers, this method uses a thin printable film and an adhesive powder to create vibrant, durable images that can be applied to a wide range of fabrics. If you’re evaluating heat transfer options, understanding the DTF transfer process and how to apply DTF transfers—along with how direct-to-film printing stacks up against DTF vs screen printing—can save time, money, and headaches. In this ultimate guide, we’ll cover what DTF transfers are, how direct-to-film printing works, the supplies you’ll need, a practical step-by-step application flow, troubleshooting tips, and best practices for achieving professional results with DTF printing on fabrics. By focusing on these fundamentals, you’ll be prepared to produce vibrant, long-lasting garments for a variety of projects.
As a film-based transfer approach, this technique is often referred to with Latent Semantic Indexing-friendly terms like direct-film printing or film-on-fabric artwork. Other common descriptors include film printing for textiles, adhesive-coated transfer sheets, and heat-press decoration using a bonded film, all pointing to the same core concept. Used across small shops and makers, these terms help content align with search intent while explaining the same step-by-step process behind DTF transfers.
DTF Transfers Explained: The DTF transfer process vs Other Printing Methods
DTF transfers operate by first designing a vivid image and then printing it onto a specialized film using direct-to-film printing technology. A white underbase or premium color layer is often added to ensure brightness and opacity before the film is coated with an adhesive powder. After curing the powder, the image is ready to be transferred to fabric with a heat press, resulting in a durable, flexible design.
This approach sits between traditional heat-transfer vinyl (HTV) and direct-to-garment (DTG) printing. When considering DTF transfers, you weigh the benefits of a broad fabric compatibility and strong color fidelity against setup time and control requirements. Compared with DTF vs screen printing, DTF transfers offer rapid turns for smaller runs and complex multi-color artwork without the need to set up screens.
Direct-to-Film Printing Essentials: Getting Started with DTF Printing on Fabrics
Getting started with direct-to-film printing requires a reliable setup: a printer capable of handling white ink or a strong white underbase, quality DTF film, and transfer sheets. Add in adhesive powder, a shaker, a curing method, and a heat press with precise temperature control to ensure consistent results across batches.
Beyond hardware, you’ll need software and color-management profiles to maintain consistent color from screen to print. This is where DTF printing on fabrics becomes a practical option for diverse projects, enabling you to manage color separations, white layers, and gloss levels for reliable, repeatable outcomes.
DTF Transfers on Fabrics: Best Practices for Different Materials
DTF transfers work well on a broad range of fabrics, including cotton, polyester blends, and poly blends. However, the fabric type will influence curing times, temperatures, and post-press care, so experimenting with swatches helps you dial in the exact settings for edge definition and bond strength.
Pre-washing garments and testing on sample fabrics reduce shrinkage and misalignment risk. Following best practices for fabric prep—like removing sizing and ensuring a flat, wrinkle-free surface—helps maintain consistent adhesion and color brightness during and after application.
DTF vs Screen Printing: When to Choose Direct-to-Film for Your Design
DTF transfers are advantageous for small to mid-sized runs, complex multi-color artwork, and designs that incorporate varied fabric content. Compared with screen printing, DTF reduces setup time and avoids intricate screen preparation, making it ideal for on-demand production.
For projects that require rapid prototyping, personalization, or frequent design changes, DTF transfers can deliver vibrant results with less overhead. When evaluating DTF vs screen printing, consider order size, color fidelity, and the ability to store or ship designs as transfers rather than finished garments.
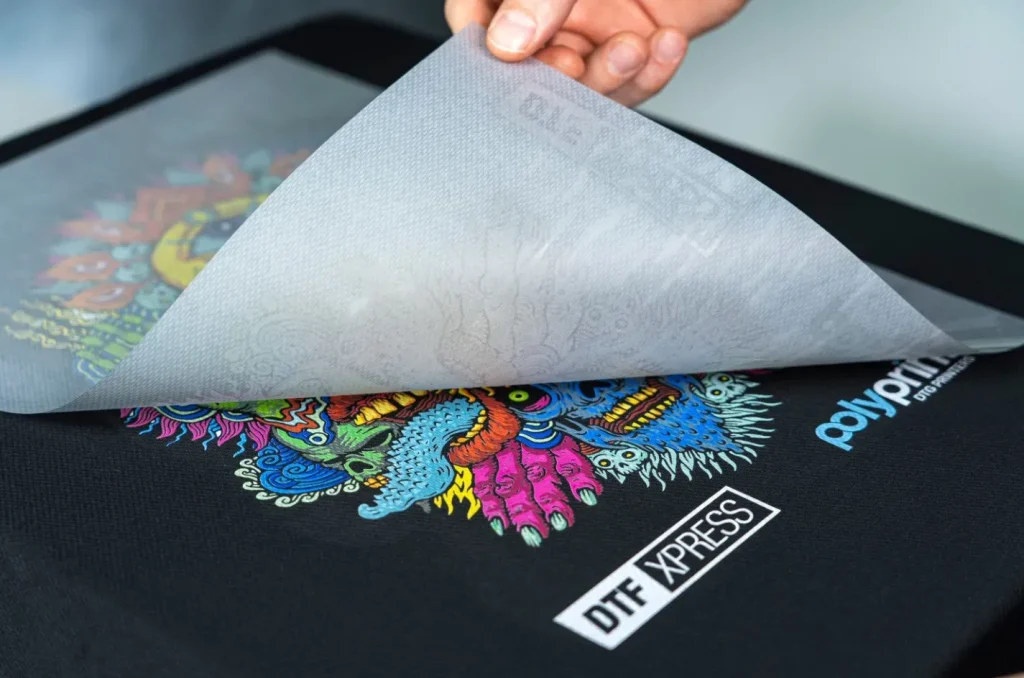
How to Apply DTF Transfers: Step-by-Step Practical Guide
Design with intention for film printing, focusing on color separations, brightness, and the necessary white underbase. This is the “design” phase of the DTF transfer process that sets the stage for a clean, crisp final result.
Next, print the design onto DTF film, coat with adhesive powder, and cure until the powder adheres. Pre-press the fabric to remove moisture, align the transfer with the garment, and apply heat and pressure at the recommended settings before performing a warm or cold peel to finish the transfer.
Frequently Asked Questions
What is the DTF transfer process and how does direct-to-film printing work for fabrics?
DTF transfers involve printing a design onto a special film, applying an adhesive powder, curing the powder, and transferring the image to fabric with a heat press. In this DTF transfer process, direct-to-film printing is used to create the color layers (often with a white underbase) before the powder is applied. The result is a vibrant, durable image that works across many fabrics and offers a balance between HTV and DTG in terms of setup, flexibility, and washability.
DTF vs screen printing: which is better for small runs and complex designs?
DTF transfers are typically more economical and faster for small runs and complex designs because you avoid making separate screens. Direct-to-film printing can reproduce multi-color artwork with fine detail easily, while screen printing becomes costlier and slower to set up for short runs. For large runs, screen printing may be more cost-effective, but DTF transfers excel at versatility and quick turnaround across varied fabrics.
How to apply DTF transfers to fabric?
Here is a practical flow: 1) design with proper color management and white underbase when needed; 2) print the design on DTF film using the printer; 3) coat with adhesive powder and cure; 4) pre-press the fabric to remove moisture and flatten the surface; 5) align the film and press at the recommended temperature (about 170–180°C / 338–356°F) for 10–15 seconds with steady pressure; 6) perform a warm or cold peel to remove the carrier; 7) allow the garment to cool before handling.
DTF printing on fabrics: which fabrics work best and how should you prep them?
DTF printing on fabrics works well with cotton, polyester blends, and other common apparel fabrics. Pre-wash garments to remove sizing and reduce shrinkage, and test on a fabric swatch to verify color brightness, edge definition, and bond strength before production. Fabric choice can affect curing times and temperatures, so adjust your heat press settings accordingly and ensure even, consistent pressure.
What supplies do I need for the DTF transfer process and how can I troubleshoot common issues like color fade or peeling?
Essential supplies include a printer capable of white ink or strong white underbase, DTF film, adhesive powder with a reliable shaker, a curing method, and a heat press with precise temperature and time control, plus color management software. Troubleshooting tips: for faded colors, verify color profiles and white underbase; for white underbase not visible, increase opacity or check powder curing; for peeling at edges, check heat-time, pressure, and allow full cooling; for misalignment, use registration markers and test on a sample garment before production.
| Key Point | Details |
|---|---|
| What are DTF transfers? | DTF transfers are a heat‑applied design created by printing onto a special film, adding an adhesive powder, curing the powder, and transferring the image to textiles with a heat press. They produce vibrant, flexible images that adhere well to cotton, polyester, blends, and other fabrics, with strong brightness and good wash durability. |
| The DTF transfer process in brief | Design and prepare: Create or choose a design optimized for film printing, considering color layers and white underbase. Print on film: Use a printer capable of white ink/underbase. Apply adhesive powder: Sprinkle powder and shake off excess. Cure the powder: Cure to fuse the powder. Transfer to fabric: Position the film on fabric and press with heat. Peel and finish: Remove the carrier with a warm or cold peel. |
| Direct-to-film printing versus other methods | DTF vs DTG: DTF uses a printed film with adhesive, works across a wider range of fabrics/colors, and can be easier to store and ship as a transfer.nDTF vs screen printing: Good for small runs and complex artwork; faster setup and versatile; less efficient for very large runs.nDTF vs HTV: Usually softer hand feel and durable wash; simpler application without extensive cutting/weeding. |
| Key supplies and prep for DTF transfers | Compatible printer with white ink or strong white underbase; high‑quality DTF film and transfer sheets; DTF software and color management profiles; adhesive powder, shaker, and curing method; heat press with precise temperature, even pressure, and a timer; clean workspace, lint‑free fabrics, and pre‑washed garments. |
| Fabric considerations and prep | DTF transfers work on cotton, polyester blends, and poly blends; fabric type influences curing times and temperatures. Pre‑wash garments to remove sizing and reduce shrinkage. Run test prints on a sample fabric swatch to confirm color brightness, edge definition, and bond strength before production. |
| Step-by-step application guide for DTF transfers | 1) Design with intention: create designs that print cleanly on film and consider color separations and white underbase.n2) Print the film: print on DTF film with proper color management and sharpness.n3) Powder coat and cure: apply adhesive powder and cure until fully adherent.n4) Pre‑press the fabric: remove moisture and wrinkles for a flat transfer surface.n5) Align and press: place film on fabric image side down; press at around 170–180°C (338–356°F) for 10–15 seconds with even pressure.n6) Peel and secure: perform a warm or cold peel; re‑press if needed to seal edges.n7) Post‑press cooling: let the garment cool completely before handling. |
| Troubleshooting common DTF transfer issues | – Faded colors: check color profiles, ensure white underbase is accurate, verify film quality. Recalibrate printer settings if needed.n- White underbase not visible: increase white opacity or adjust printing order; ensure powder is evenly coated and cured.n- Peeling/cracking at edges: verify sufficient heating time and pressure; use fresh adhesive powder; ensure garment is cooled before handling.n- Uneven color/misalignment: use registration markers and a stable press; test on a garment before production. |
| DTF printing on fabrics: best practices and care | Wash garments in cold to warm water with mild detergent; turn shirts inside‑out. Air dry or tumble dry low; avoid high heat. Store away from direct sunlight. Periodically calibrate the printer and recheck color profiles to maintain batch consistency. |
| Cost, speed, and scalability considerations | DTF transfers can be cost‑effective for small to mid sized runs and designs with many colors. Upfront investment in printer, film, and adhesive powder is offset by flexibility and reduced setup for complex designs. Turnaround times are often faster for small batches than traditional screen printing; as you scale, maintain a consistent workflow, reliable supplies, and robust testing. |